
Ultimate Guide to Solar Panel Care on Metal Roofs
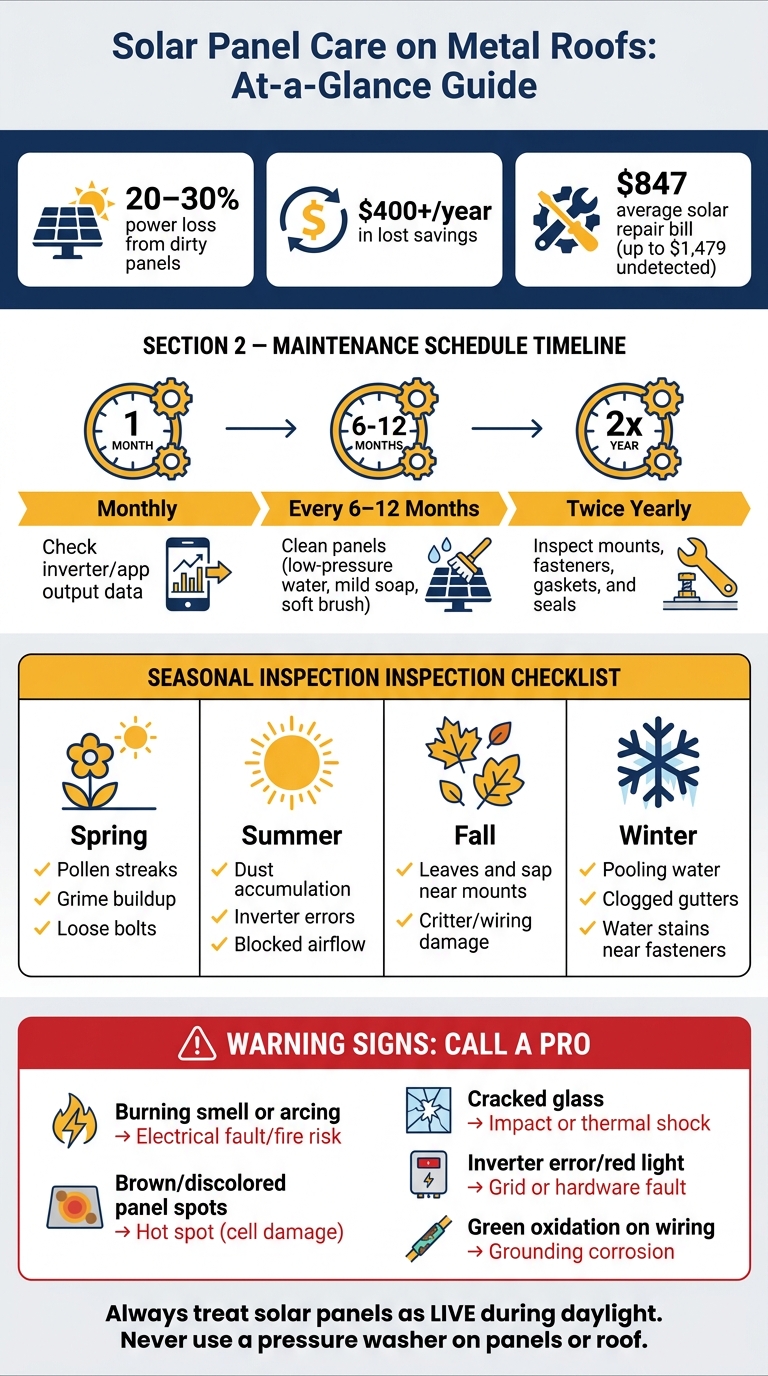
Dirty solar panels on a metal roof can cut power by 20% to 30% and cost you more than $400 per year in lost savings. If I want my system to keep working well, I need a simple plan: check output monthly, inspect the roof and mounts by season, clean panels every 6 to 12 months, and call a licensed pro for wiring, leaks, or storm damage.
Here’s the short version:
- Watch production each month in the inverter or app
- Look from the ground first for dirt, ash, leaves, cracked glass, or loose parts
- Clean with low-pressure water, mild soap, and a soft brush
- Never use a pressure washer or harsh cleaners on panels or roof coating
- Check mounts and fasteners twice a year, especially seals on screw-down systems
- Be extra careful after heat, wind, hail, or ash
- Treat solar equipment as live in daylight
- Call a pro for electrical faults, hardware movement, leaks, or steep-roof access
A metal roof can last 40 to 70 years, so it can outlast the solar system on top of it. But the roof type matters. Standing seam roofs often use non-penetrating clamps, while corrugated and trapezoidal roofs often use screws and gaskets that need closer checks for wear, rust, and leaks.
Solar Panel Maintenance on Metal Roofs: Seasonal Inspection Checklist & Key Stats
Quick Comparison
| Area | What I check | Main risk |
|---|---|---|
| Panels | Dust, pollen, bird droppings, ash, cracked glass | Lower output, hot spots |
| Roof surface | Coating wear, pooling water, debris in valleys | Rust, leaks |
| Mounts and fasteners | Loose clamps, shifted rails, worn gaskets | Movement, water entry |
| Wiring and inverter | Alerts, red lights, burn marks, corrosion | Shock, fire, system fault |
| Airflow and shade | Leaves, nests, blocked gaps under panels | Heat loss, lower output |
Bottom line: gentle cleaning, simple checks, and fast action after warning signs can help protect both solar output and the metal roof under it.
sbb-itb-e33e3b1
Routine Inspection and Cleaning for Metal-Roof Solar Systems
Once you know what causes power loss, the next step is pretty simple: check for those issues before they turn into bigger ones. Start from the ground. A visual scan with binoculars can help you spot cracked glass, discoloration, bird droppings, and debris sitting on panels or around the mounts.
What to Check During Monthly and Seasonal Inspections
A quick monthly check can save you a lot of trouble later. Look for error lights, system alerts, or a sudden drop in output. If production dips and the weather doesn’t explain it, that’s your sign to take a closer look.
Then, once each season, do a more careful walk-around. The trouble spots change through the year, so it helps to know what tends to show up when:
| Season | What to Look For |
|---|---|
| Spring | Pollen streaks, grime buildup, loose bolts |
| Summer | Dust accumulation, inverter errors, blocked airflow beneath panels |
| Fall | Leaves and sap near mounts, signs of critters chewing wiring |
| Winter | Pooling water on low-slope sections, clogged gutters, water stains near fasteners |
Clogged gutters also deserve a look during every seasonal check. On corrugated roofs in particular, debris tends to settle in the narrow vertical valleys.
Cleaning Methods That Protect Panels and Roof Coatings
If you spot buildup, clean it off before it starts dragging down output. Shut down the system based on the manufacturer’s instructions. Clean early in the morning or later in the day, rinse with low-pressure water, then wash with a soft brush, mild soap, and lukewarm water. After that, rinse well so no soap film is left behind.
Never use a pressure washer. High-pressure water can damage panel seals and void warranties. Skip abrasive pads, metal scrapers, bleach, and ammonia-based cleaners too.
How Dirt, Heat, and Debris Cut Solar Output
Dirt doesn’t just make panels look bad. It blocks sunlight from reaching the solar cells. Bird droppings and pollen are even worse because they create shaded spots that can drag down output across a full string of panels.
Heat plays a part too. Panel efficiency starts to drop once temperatures go above 77°F. Metal roofs usually stay cooler than dark asphalt roofs, which helps, but blocked airflow can chip away at that edge.
If output still looks low after cleaning, move on to the mounts and the system’s performance data.
Metal Roof Mounts, Hardware, and Performance Monitoring
Attachment Points, Clamps, Rails, and Fasteners
Once the panels are clean, take a close look at the hardware that keeps the system attached to the roof. The setup will depend on the roof style. Standing seam roofs use seam clamps. Corrugated and trapezoidal roofs usually use anchored L-feet or mini-rails. Either way, inspect the clamps, rails, bolts, and seals.
During your twice-yearly hardware check, watch for clamps that have slid along the seam, rails that look bowed or out of line, and bolts or fasteners that seem loose. On systems that penetrate the roof, inspect the EPDM gaskets and UV-rated sealants around each screw point. Cracking, drying, or other wear can be a sign that the seal is starting to fail.
If anything looks loose or out of place, don't guess. Have a professional re-torque the hardware to the manufacturer's torque specs.
Corrosion, Roof Movement, and Finish Damage
Metal roofs move as temperatures change, so the mounts need to move with them. If the hardware binds the roof, that can lead to stress, wear, oil canning, and leaks.
Oil canning, the waviness that can show up in metal panels, is one clue that the mounts may be limiting the roof's normal thermal movement. Bent hardware near attachment points is another warning sign. Also check spots where dissimilar metals make contact, since that can lead to galvanic corrosion. If the system uses isolating pads, make sure they're still in place and not damaged.
Using Inverter or App Data to Spot Problems Early
After the visual check, open the monitoring app and confirm that the system is performing as expected. Check production data at least once a month so you know what normal output looks like.
If production drops for no clear reason and the weather doesn't explain it, the issue could be debris under the panels, a loose wiring connection, or hardware that shifted after a storm.
After severe weather, high winds, or hail, review the app for ground-fault or wiring alerts. Those warnings can point to damaged wiring or grounding issues at the metal mounting points, and that can create a fire hazard. If the alerts suggest wiring or grounding trouble, stop there and call for professional service.
Roof Access, Electrical Safety, and When to Call a Pro
Safe Roof Access on Metal Surfaces
If an inspection or app alert points to a problem, start with the safest option: stay on the ground if you can. If cleaning or routine monitoring suggests something is off, move to roof access only when you can't confirm the issue from below. And before you step onto the roof, use binoculars to double-check the problem and cut down the time you spend up there.
Don’t get on the roof during high winds, extreme heat, or right after rain. Wet, dusty, or overheated metal roofs can get slick fast.
For steep, tall, or hard-to-navigate roofs, use fall protection that works with metal roofing. The catch is that the wrong anchor setup can damage seams or create leak points. At that stage, it’s smarter to bring in a professional.
If the issue involves wiring, hot spots, or damaged glass, stop at a visual check and move to the electrical safety rules below.
Electrical and Fire Safety Around Solar Equipment
Treat solar panels as live whenever there’s daylight. Before touching any part of the system, follow the inverter shutdown steps required by the manufacturer.
Keep your distance from junction boxes, wiring, and conduit connections. These are not DIY items. If you spot any of the warning signs below, stop and call a professional right away:
| Warning Sign | What It May Indicate |
|---|---|
| Burning smell or visible arcing | Electrical fault or fire risk |
| Brown or discolored panel spots | Hot spot (cell damage) |
| Cracked glass on a module | Impact damage or thermal shock |
| Inverter error code or red indicator light | Grid, ground, or hardware fault |
| Green oxidation on wiring or clamps | Corrosion in the grounding system |
Grounding matters even more on metal roofs because the roof itself conducts electricity.
When to Hire a Professional
Once the problem goes past cleaning or a visual check, it’s time to hand it off. Homeowners should stick to app monitoring and visual inspections. Once damage shows up, metal-roof attachments, flashing, and wiring need licensed handling. That includes:
- All electrical work
- Inverter maintenance
- Hardware adjustments and post-storm repairs
- Leak repairs near mounting points or flashing
The cost of waiting can add up. The average solar repair bill is $847 and can climb to $1,479 when problems go undetected.
In the San Gabriel Valley, CAP Metal Build offers inspections for metal roofing and solar mounting hardware in heat- and dust-prone conditions.
Conclusion: A Simple Care Plan for Long-Term Solar and Roof Performance
A simple routine goes a long way: inspect in spring and fall, clean every 6 to 12 months, and check your inverter or app data each month. Those small habits don’t just help your solar setup. They help protect the roof too.
Keep tree branches at least 3 feet from the roof to cut down on sap deposits, scratches, and rodent access. That kind of basic upkeep can help a metal roof last for decades. When issues get missed, costs can climb fast.
Small problems don’t stay small for long. If the job goes beyond a visual check - including electrical concerns, hardware adjustments, post-storm repairs, or access on a steep roof - call a licensed professional. In the San Gabriel Valley, CAP Metal Build can help with metal roof and solar-mount service needs. Log every cleaning, inspection, and repair to protect warranties and make insurance claims easier. It also gives you a clear record of system performance over time.
FAQs
How do I know if my panels need cleaning?
Monitor your system’s performance and give it a quick visual check. If energy output stays down by 5% to 10% and the dip can’t be explained by weather or normal seasonal shifts, dirt buildup may be the cause.
Look for dust, pollen, bird droppings, heavy debris, patchy discoloration, or new shade from tree growth. And if it’s been more than 12 months since the last cleaning, it’s probably time for maintenance.
What kind of metal roof needs the most solar maintenance?
Metal roofs with corrugated or exposed-fastener panels usually need the most solar maintenance. Unlike standing seam roofs, they require drilling for mounting brackets, so each attachment point needs careful sealing and regular checks for corrosion or wear.
Because of that, it’s smart to keep an eye on the fasteners, flashings, and sealants. Those parts do a lot of the heavy lifting when it comes to keeping the roof weather-tight over time.
When should I call a pro instead of doing it myself?
Basic solar panel cleaning is something many homeowners can handle. But when the job involves wiring, mounting hardware, or the inverter, it’s time to call a professional.
Here’s the simple rule: if you can’t reach the panels safely from the ground, don’t do it yourself. A DIY fix can void your warranty, damage your metal roof, or create electrical hazards.
For more involved or structural issues, CAP Metal Build can help keep your installation secure and in line with local standards.