Thinking of Installing a Metal Roof? Here’s What You Need to Know.
Choosing a metal roof is one of the smartest long-term upgrades you can make to your home. It’s not just about looks — it’s about durability, performance, and peace of mind. Below is a clear breakdown of why metal roofing stands out and what you can expect during the installation process.
Why Choose a Metal Roof?
• Durability
Metal roofs last 50 to 100 years, dramatically outperforming standard asphalt roofs, which typically last 15 to 25 years at best. This makes metal roofing a true long-term investment rather than a recurring replacement.
• Energy Savings
Metal roofing systems are typically Kynar-coated, providing excellent heat reflection. This reflective quality can reduce attic heat buildup and lower cooling costs, often saving homeowners 20–30% on air-conditioning expenses.
• Low Maintenance
Metal roofs are:
- Resistant to moss and algae
- Fire-resistant
- Built to withstand extreme weather
- Designed to last decades with minimal upkeep
• Environmentally Friendly
Metal roofing is a fully recyclable material, making it a sustainable choice for environmentally conscious homeowners.
• Title 24 Compliant
Most modern metal roofing systems meet or exceed California Title 24 energy requirements, helping with permitting and long-term efficiency.
• Lightweight Structure
Metal roofing weighs significantly less than tile or slate, placing less stress on your home’s structure while still offering superior protection.
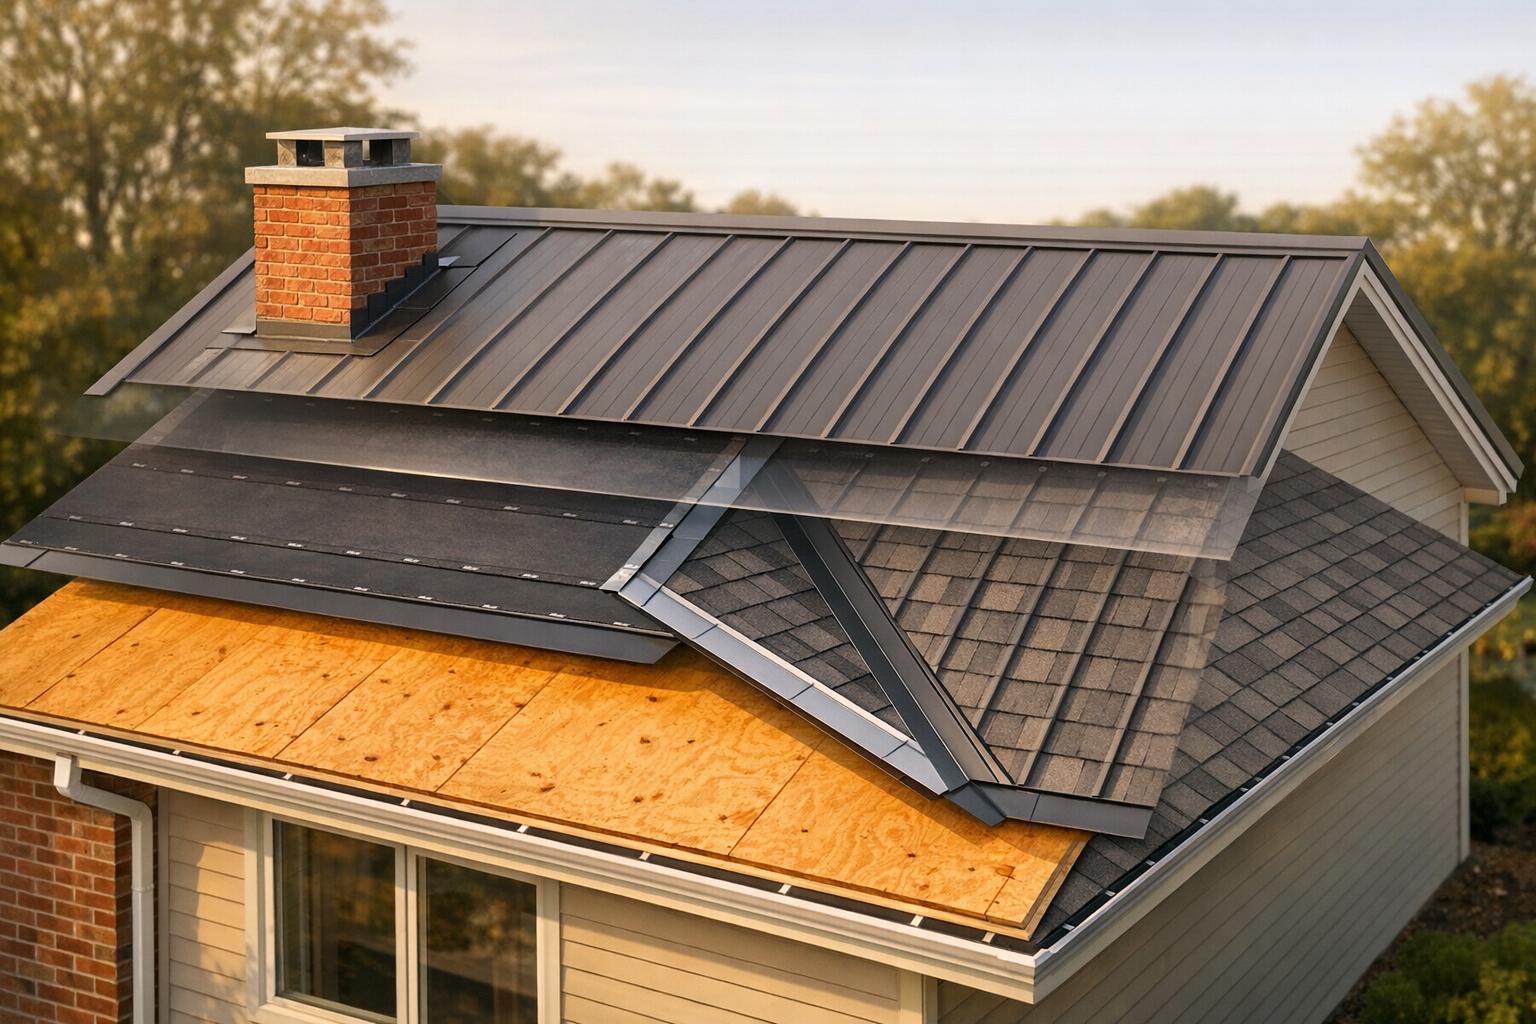
What to Expect During Metal Roof Installation
Once you decide to move forward and have us handle your project, here’s how the process typically unfolds:
Step 1: Permitting
We begin by pulling the required city permits. Once approved, we order materials and schedule the roof removal and start date.
Step 2: Roof Removal
Your existing roofing system is carefully removed to expose the roof deck.
Step 3: Wood Replacement
Any rotted, damaged, or compromised wood is replaced. This is critical — a metal roof is only as good as the nail backer beneath it.
Step 4: Pre-Inspection
After structural repairs are complete, we call for a city pre-inspection. Once approved, we’re cleared to install the new roofing system.
Step 5: Underlayment Installation
We install the protective underlayment layer. This can be mechanically attached or self-adhered, but in most cases, peel-and-stick underlayment is ideal for metal roofing. Fire-resistant underlayment options are also available — your rep can walk you through those choices.
Step 6: Metal Roof Installation
Installation begins with:
- All perimeter and trim metal
- Panel installation across the field of the roof
- Hip and ridge flashings to seal everything off
All flashings are brand new, and final details are painted to match where required for a clean, finished look.
Step 7: Final Walk-Through & Inspection
Once complete, we conduct a final walk-around with the homeowner, then call for the city’s final inspection. Any punch-list items are addressed before final payment is collected.
Choosing the Right Type of Metal
Coastal Homes
If your home is near the ocean, aluminum is the best option — either aluminum standing seam or aluminum shingles — due to its corrosion resistance.
Neighborhood & City Requirements
In many Southern California cities, homes must remain architecturally indigenous to the neighborhood. Some areas won’t allow standing seam but will allow metal shingles designed to resemble wood shake or slate. We offer a wide range of profiles, styles, and designs to meet these requirements.
A Permanent Upgrade, Not a Temporary Fix
Once installed, a metal roof should be considered a permanent upgrade.
Most other roofing systems — including asphalt shingles and clay tile — are temporary by nature. They are not fully watertight forever and will eventually fail.
Our goal is simple: to provide permanent roofing solutions, not short-term patches.
There are many things homeowners should do to prepare for roof removal, but any reputable roofing professional will guide you through that process step by step.
A Quick Word on Premium Metals
If you’re considering copper or zinc — they’re stunning, but be prepared. These are premium materials with premium price tags.
Final Advice: Choose the Right Contractor
No matter how good the material is, the installer matters.
Always make sure your contractor is:
- Licensed
- Bonded
- Insured
- A-rated with the Better Business Bureau
- Proven, professional, and ready to do good business
Metal roofing is an investment — and with the right team, it’s one that pays off for generations.
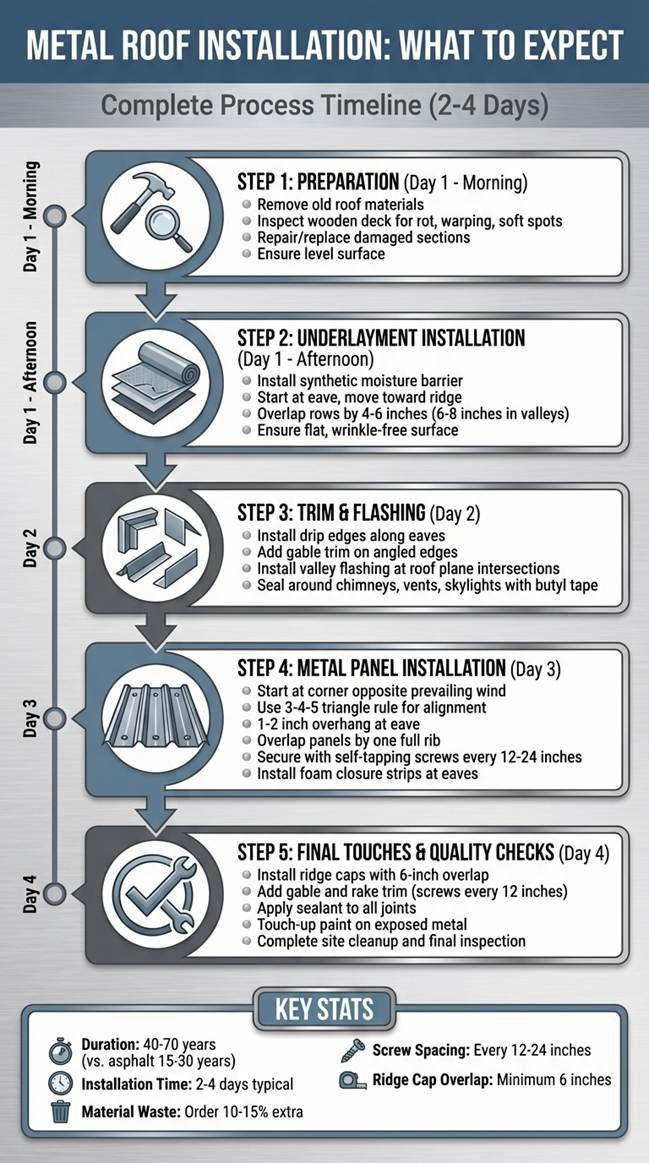
Simple Installation Timeline at a Glance
Most residential metal roof installations take 2–4 days, depending on roof size, complexity, and weather conditions.
Day 1: Tear-off, deck inspection, and repairs
Day 2: Underlayment, trim, and flashing installation
Day 3–4: Metal panel installation, ridge caps, and finishing details
Final Step: Cleanup, homeowner walkthrough, and city inspection
Our team keeps the jobsite clean, protects landscaping, and communicates with you at every stage so there are no surprises.
How to Prepare Before Installation
A little preparation helps everything run smoothly:
• Move vehicles away from the driveway
• Remove fragile wall hangings inside (minor vibration may occur)
• Protect outdoor furniture and plants
• Keep pets and children clear of the work zone
We’ll guide you through everything ahead of time so you feel fully prepared.
Ready to Upgrade?
A properly installed metal roof isn’t just another roofing system — it’s a lifetime solution that adds value, efficiency, and long-term protection to your home.
If you’re considering a metal roof, schedule a consultation, explore your options, and let’s build something that lasts.
Partnering with
Partnering with CAP Metal Build
CAP Metal Build provides expert metal roofing services for the San Gabriel Valley, tailored to meet the demands of Southern California's unique climate. Their materials are engineered to handle the challenges of strong Santa Ana winds and intense UV exposure. Plus, their reflective coatings can help lower cooling costs during the hot summer months. Throughout the project, a single point of contact ensures clear and consistent communication, making the process smooth and hassle-free.
Request a Quote or Consultation
Ready to move forward? Reach out to CAP Metal Build to schedule a site inspection. During this visit, they’ll assess your roof’s condition, take precise measurements, and provide a detailed bid. You’ll also have the chance to discuss material options, such as panel profiles, metal types, colors, and finishes. The quote will include plans for addressing potential issues like hidden water damage or structural concerns, so you’ll know exactly what to expect.
Visit capmetalbuild.com or give them a call today to book your consultation and take the next step toward your new metal roof.
FAQs
How can I choose the best metal roofing material for my local weather conditions?
Choosing the right metal roofing material largely hinges on the weather conditions in your area. For places that experience heavy rain, strong winds, or hail, steel and aluminum stand out as reliable options. Steel is known for its strength, making it a solid choice for harsher environments, while aluminum is lightweight and resists corrosion, especially in coastal regions where salt exposure is a concern.
For areas with extreme temperature swings, copper and zinc are excellent options. These materials handle both heat and cold exceptionally well, offering long-term performance. Plus, many metal roofs now come with reflective coatings that can help reduce cooling costs in warmer climates by reflecting sunlight more effectively.
To make the best decision for your home, it’s a good idea to consult a local roofing professional. They can assess your specific climate conditions, structural requirements, and aesthetic preferences to guide you toward the most suitable material.
What steps are involved in installing a metal roof?
The process of installing a metal roof involves several important steps to ensure it stands up to the elements and lasts for years. It begins with preparing the roof by removing the old materials, checking the roof deck for damage, and making any necessary repairs. An underlayment is then applied to provide a sturdy, protective base for the metal panels.
Next, the metal panels are measured, cut, and installed, starting at the eaves and working upward toward the ridge. Care is taken to ensure proper overlaps between panels, and screws with rubber washers are used to secure everything tightly. This attention to detail helps prevent leaks and ensures the roof can withstand harsh weather.
After the panels are in place, ridge caps and closure strips are added to seal the roof's edges and joints. These areas are carefully sealed to make the roof watertight. The final step is a thorough inspection to confirm everything has been installed correctly, followed by cleaning up the worksite. This methodical process results in a durable, weather-resistant roof that looks great and performs well in varying conditions.
How can I make sure my metal roof installation meets local building codes?
To make sure your metal roof installation aligns with local building codes, the first step is to review the specific regulations and permit requirements in your area. Reach out to your local building authorities or permitting office - they can provide the details you need regarding approved materials, ventilation standards, and essential safety measures.
Hiring licensed and experienced contractors is equally critical. Contractors who are well-versed in local codes can simplify the permitting process and ensure your roof is installed according to all necessary standards. Additionally, familiarizing yourself with industry guidelines, such as those from the Metal Construction Association or the National Roofing Contractors Association, can give you added peace of mind that the job is being done right.
By following these steps, you can avoid unnecessary delays, fines, or complications, ensuring your metal roof is safe and fully compliant with the required regulations.